DAST API (ULTIMATE)
You can add dynamic application security testing of web APIs to your GitLab CI/CD pipelines. This helps you discover bugs and potential security issues that other QA processes may miss.
We recommend that you use DAST API testing in addition to GitLab Secure's other security scanners and your own test processes. If you're using GitLab CI/CD, you can run DAST API tests as part your CI/CD workflow.
Requirements
- One of the following web API types:
- REST API
- SOAP
- GraphQL
- Form bodies, JSON, or XML
- One of the following assets to provide APIs to test:
- OpenAPI v2 or v3 API definition
- Postman Collection v2.0 or v2.1
- HTTP Archive (HAR) of API requests to test
When DAST API scans run
When using the DAST-API.gitlab-ci.yml template, the defined jobs use the dast stage by default. To enable your .gitlab-ci.yml file must include the dast stage in your stages definition. To ensure DAST API scans the latest code, your CI pipeline should deploy changes to a test environment in a stage before the dast stage:
stages:
  - build
  - test
  - deploy
  - dast
Note that if your pipeline is configured to deploy to the same web server on each run, running a pipeline while another is still running could cause a race condition in which one pipeline overwrites the code from another. The API to scan should be excluded from changes for the duration of a DAST API scan. The only changes to the API should be from the DAST API scanner. Be aware that any changes made to the API (for example, by users, scheduled tasks, database changes, code changes, other pipelines, or other scanners) during a scan could cause inaccurate results.
Enable DAST API scanning
There are three ways to perform scans. See the configuration section for the one you wish to use:
Examples of various configurations can be found here:
- Example OpenAPI v2 specification project
- Example HTTP Archive (HAR) project
- Example Postman Collection project
- Example GraphQL project
- Example SOAP project
WARNING:
GitLab 14.0 will require that you place DAST API configuration files (for example,
gitlab-dast-api-config.yml) in your repository's .gitlab directory instead of your
repository's root. You can continue using your existing configuration files as they are, but
starting in GitLab 14.0, GitLab will not check your repository's root for configuration files.
OpenAPI Specification
Support for OpenAPI Specification using YAML format was introduced in GitLab 14.0.
The OpenAPI Specification (formerly the Swagger Specification) is an API description format for REST APIs. This section shows you how to configure API fuzzing using an OpenAPI Specification to provide information about the target API to test. OpenAPI Specifications are provided as a file system resource or URL. Both JSON and YAML OpenAPI formats are supported.
DAST API uses an OpenAPI document to generate the request body. When a request body is required, the body generation is limited to these body types:
application/x-www-form-urlencodedmultipart/form-dataapplication/json
Follow these steps to configure DAST API in GitLab with an OpenAPI specification:
-
To use DAST API, you must include the
DAST-API.gitlab-ci.ymltemplate that's provided as part of your GitLab installation. Add the following to your.gitlab-ci.ymlfile:stages: - dast include: - template: DAST-API.gitlab-ci.yml -
The configuration file has several testing profiles defined with different checks enabled. We recommend that you start with the
Quickprofile. Testing with this profile completes faster, allowing for easier configuration validation.Provide the profile by adding the
DAST_API_PROFILECI/CD variable to your.gitlab-ci.ymlfile, substitutingQuickfor the profile you choose:stages: - dast include: - template: DAST-API.gitlab-ci.yml variables: DAST_API_PROFILE: Quick -
Provide the location of the OpenAPI specification. You can provide the specification as a file or URL. Specify the location by adding the
DAST_API_OPENAPIvariable:stages: - dast include: - template: DAST-API.gitlab-ci.yml variables: DAST_API_PROFILE: Quick DAST_API_OPENAPI: test-api-specification.json -
The target API instance's base URL is also required. Provide it by using the
DAST_API_TARGET_URLvariable or anenvironment_url.txtfile.Adding the URL in an
environment_url.txtfile at your project's root is great for testing in dynamic environments. To run DAST API against an app dynamically created during a GitLab CI/CD pipeline, have the app persist its URL in anenvironment_url.txtfile. DAST API automatically parses that file to find its scan target. You can see an example of this in our Auto DevOps CI YAML.Here's an example of using
DAST_API_TARGET_URL:stages: - dast include: - template: DAST-API.gitlab-ci.yml variables: DAST_API_PROFILE: Quick DAST_API_OPENAPI: test-api-specification.json DAST_API_TARGET_URL: http://test-deployment/
This is a minimal configuration for DAST API. From here you can:
- Run your first scan.
- Add authentication.
- Learn how to handle false positives.
WARNING: NEVER run DAST API testing against a production server. Not only can it perform any function that the API can, it may also trigger bugs in the API. This includes actions like modifying and deleting data. Only run DAST API scanning against a test server.
HTTP Archive (HAR)
The HTTP Archive format (HAR) is an archive file format for logging HTTP transactions. When used with the GitLab DAST API scanner, HAR must contain records of calling the web API to test. The DAST API scanner extracts all the requests and uses them to perform testing.
You can use various tools to generate HAR files:
- Insomnia Core: API client
- Chrome: Browser
- Firefox: Browser
- Fiddler: Web debugging proxy
- GitLab HAR Recorder: Command line
WARNING: HAR files may contain sensitive information such as authentication tokens, API keys, and session cookies. We recommend that you review the HAR file contents before adding them to a repository.
Follow these steps to configure DAST API to use a HAR file that provides information about the target API to test:
-
To use DAST API, you must include the
DAST-API.gitlab-ci.ymltemplate that's provided as part of your GitLab installation. To do so, add the following to your.gitlab-ci.ymlfile:stages: - dast include: - template: DAST-API.gitlab-ci.yml -
The configuration file has several testing profiles defined with different checks enabled. We recommend that you start with the
Quickprofile. Testing with this profile completes faster, allowing for easier configuration validation.Provide the profile by adding the
DAST_API_PROFILECI/CD variable to your.gitlab-ci.ymlfile, substitutingQuickfor the profile you choose:stages: - dast include: - template: DAST-API.gitlab-ci.yml variables: DAST_API_PROFILE: Quick -
Provide the location of the HAR specification. You can provide the specification as a file or URL. URL support was introduced in GitLab 13.10 and later. Specify the location by adding the
DAST_API_HARvariable:stages: - dast include: - template: DAST-API.gitlab-ci.yml variables: DAST_API_PROFILE: Quick DAST_API_HAR: test-api-recording.har -
The target API instance's base URL is also required. Provide it by using the
DAST_API_TARGET_URLvariable or anenvironment_url.txtfile.Adding the URL in an
environment_url.txtfile at your project's root is great for testing in dynamic environments. To run DAST API against an app dynamically created during a GitLab CI/CD pipeline, have the app persist its URL in anenvironment_url.txtfile. DAST API automatically parses that file to find its scan target. You can see an example of this in our Auto DevOps CI YAML.Here's an example of using
DAST_API_TARGET_URL:stages: - dast include: - template: DAST-API.gitlab-ci.yml variables: DAST_API_PROFILE: Quick DAST_API_HAR: test-api-recording.har DAST_API_TARGET_URL: http://test-deployment/
This is a minimal configuration for DAST API. From here you can:
- Run your first scan.
- Add authentication.
- Learn how to handle false positives.
WARNING: NEVER run DAST API testing against a production server. Not only can it perform any function that the API can, it may also trigger bugs in the API. This includes actions like modifying and deleting data. Only run DAST API against a test server.
Postman Collection
The Postman API Client is a popular tool that developers and testers use to call various types of APIs. The API definitions can be exported as a Postman Collection file for use with DAST API. When exporting, make sure to select a supported version of Postman Collection: v2.0 or v2.1.
When used with the GitLab DAST API scanner, Postman Collections must contain definitions of the web API to test with valid data. The DAST API scanner extracts all the API definitions and uses them to perform testing.
WARNING: Postman Collection files may contain sensitive information such as authentication tokens, API keys, and session cookies. We recommend that you review the Postman Collection file contents before adding them to a repository.
Follow these steps to configure DAST API to use a Postman Collection file that provides information about the target API to test:
-
To use DAST API, you must include the
DAST-API.gitlab-ci.ymltemplate that's provided as part of your GitLab installation. To do so, add the following to your.gitlab-ci.ymlfile:stages: - dast include: - template: DAST-API.gitlab-ci.yml -
The configuration file has several testing profiles defined with different checks enabled. We recommend that you start with the
Quickprofile. Testing with this profile completes faster, allowing for easier configuration validation.Provide the profile by adding the
DAST_API_PROFILECI/CD variable to your.gitlab-ci.ymlfile, substitutingQuickfor the profile you choose:stages: - dast include: - template: DAST-API.gitlab-ci.yml variables: DAST_API_PROFILE: Quick -
Provide the location of the Postman Collection specification. You can provide the specification as a file or URL. Specify the location by adding the
DAST_API_POSTMAN_COLLECTIONvariable:stages: - dast include: - template: DAST-API.gitlab-ci.yml variables: DAST_API_PROFILE: Quick DAST_API_POSTMAN_COLLECTION: postman-collection_serviceA.json -
The target API instance's base URL is also required. Provide it by using the
DAST_API_TARGET_URLvariable or anenvironment_url.txtfile.Adding the URL in an
environment_url.txtfile at your project's root is great for testing in dynamic environments. To run DAST API against an app dynamically created during a GitLab CI/CD pipeline, have the app persist its URL in anenvironment_url.txtfile. DAST API automatically parses that file to find its scan target. You can see an example of this in our Auto DevOps CI YAML.Here's an example of using
DAST_API_TARGET_URL:stages: - dast include: - template: DAST-API.gitlab-ci.yml variables: DAST_API_PROFILE: Quick DAST_API_POSTMAN_COLLECTION: postman-collection_serviceA.json DAST_API_TARGET_URL: http://test-deployment/
This is a minimal configuration for DAST API. From here you can:
- Run your first scan.
- Add authentication.
- Learn how to handle false positives.
WARNING: NEVER run DAST API testing against a production server. Not only can it perform any function that the API can, it may also trigger bugs in the API. This includes actions like modifying and deleting data. Only run DAST API against a test server.
Postman variables
Postman allows the developer to define placeholders that can be used in different parts of the requests. These placeholders are called variables, as explained in Using variables. You can use variables to store and reuse values in your requests and scripts. For example, you can edit the collection to add variables to the document:

You can then use the variables in sections such as URL, headers, and others:
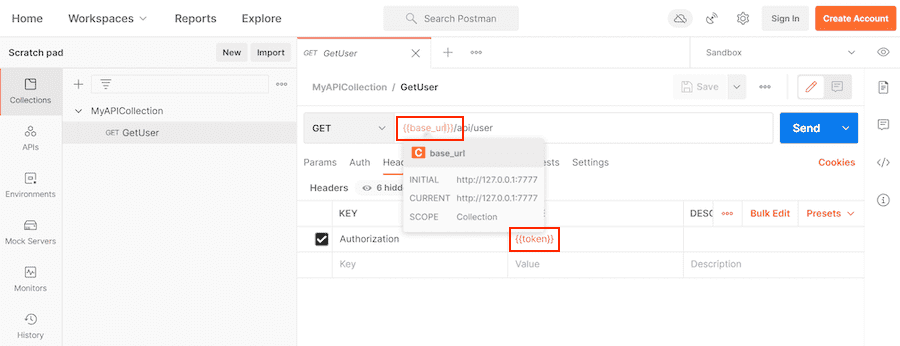
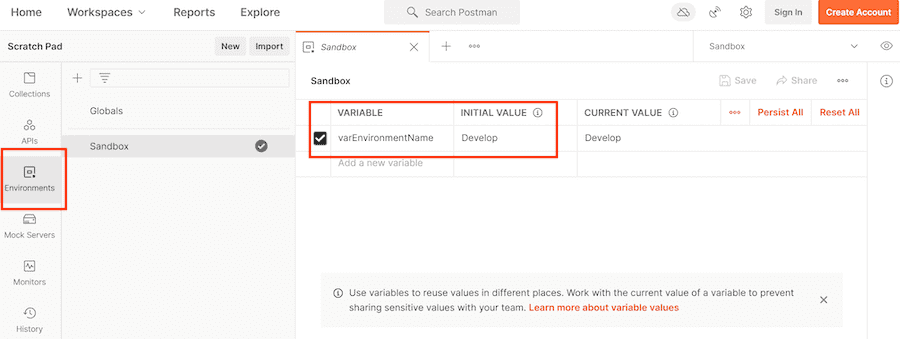
Variables can be defined at different scopes (for example, Global, Collection, Environment, Local, and Data). In this example, they're defined at the Environment scope:
When you export a Postman collection, only Postman collection variables are exported into the Postman file. For example, Postman does not export environment-scoped variables into the Postman file.
By default, the DAST API scanner uses the Postman file to resolve Postman variable values. If a JSON file
is set in a GitLab CI environment variable DAST_API_POSTMAN_COLLECTION_VARIABLES, then the JSON
file takes precedence to get Postman variable values.
Although Postman can export environment variables into a JSON file, the format is not compatible
with the JSON expected by DAST_API_POSTMAN_COLLECTION_VARIABLES.
Here is an example of using DAST_API_POSTMAN_COLLECTION_VARIABLES:
stages:
  - dast

include:
  - template: DAST-API.gitlab-ci.yml
variables:
DAST_API_PROFILE: Quick
DAST_API_POSTMAN_COLLECTION: postman-collection_serviceA.json
DAST_API_POSTMAN_COLLECTION_VARIABLES: variable-collection-dictionary.json
DAST_API_TARGET_URL: http://test-deployment/The file variable-collection-dictionary.json is a JSON document. This JSON is an object with
key-value pairs for properties. The keys are the variables' names, and the values are the variables'
values. For example:
{
"base_url": "http://127.0.0.1/",
"token": "Token 84816165151"
}Authentication
Authentication is handled by providing the authentication token as a header or cookie. You can provide a script that performs an authentication flow or calculates the token.
HTTP Basic Authentication
HTTP basic authentication
is an authentication method built in to the HTTP protocol and used in conjunction with
transport layer security (TLS).
To use HTTP basic authentication, two CI/CD variables are added to your .gitlab-ci.yml file:
-
DAST_API_HTTP_USERNAME: The username for authentication. -
DAST_API_HTTP_PASSWORD: The password for authentication.
For the password, we recommended that you create a CI/CD variable
(for example, TEST_API_PASSWORD) set to the password. You can create CI/CD variables from the
GitLab projects page at Settings > CI/CD, in the Variables section. Use that variable
as the value for DAST_API_HTTP_PASSWORD:
stages:
  - dast

include:
  - template: DAST-API.gitlab-ci.yml

variables:
  DAST_API_PROFILE: Quick
DAST_API_HAR: test-api-recording.har
DAST_API_TARGET_URL: http://test-deployment/
DAST_API_HTTP_USERNAME: testuser
DAST_API_HTTP_PASSWORD: $TEST_API_PASSWORDBearer Tokens
Bearer tokens are used by several different authentication mechanisms, including OAuth2 and JSON Web
Tokens (JWT). Bearer tokens are transmitted using the Authorization HTTP header. To use bearer
tokens with DAST API, you need one of the following:
- A token that doesn't expire
- A way to generate a token that lasts the length of testing
- A Python script that DAST API can call to generate the token
Token doesn't expire
If the bearer token doesn't expire, use the DAST_API_OVERRIDES_ENV variable to provide it. This
variable's content is a JSON snippet that provides headers and cookies to add to DAST API's
outgoing HTTP requests.
Follow these steps to provide the bearer token with DAST_API_OVERRIDES_ENV:
-
Create a CI/CD variable, for example
TEST_API_BEARERAUTH, with the value{"headers":{"Authorization":"Bearer dXNlcm5hbWU6cGFzc3dvcmQ="}}(substitute your token). You can create CI/CD variables from the GitLab projects page at Settings > CI/CD, in the Variables section. -
In your
.gitlab-ci.ymlfile, setDAST_API_OVERRIDES_ENVto the variable you just created:stages: - dast include: - template: DAST-API.gitlab-ci.yml variables: DAST_API_PROFILE: Quick DAST_API_OPENAPI: test-api-specification.json DAST_API_TARGET_URL: http://test-deployment/ DAST_API_OVERRIDES_ENV: $TEST_API_BEARERAUTH -
To validate that authentication is working, run an DAST API test and review the job logs and the test API's application logs.
Token generated at test runtime
If the bearer token must be generated and doesn't expire during testing, you can provide to DAST API a file containing the token. A prior stage and job, or part of the DAST API job, can generate this file.
DAST API expects to receive a JSON file with the following structure:
{
"headers" : {
"Authorization" : "Bearer dXNlcm5hbWU6cGFzc3dvcmQ="
}
}This file can be generated by a prior stage and provided to DAST API through the
DAST_API_OVERRIDES_FILE CI/CD variable.
Set DAST_API_OVERRIDES_FILE in your .gitlab-ci.yml file:
stages:
  - dast

include:
  - template: DAST-API.gitlab-ci.yml

variables:
  DAST_API_PROFILE: Quick
  DAST_API_OPENAPI: test-api-specification.json
DAST_API_TARGET_URL: http://test-deployment/
DAST_API_OVERRIDES_FILE: output/dast-api-overrides.jsonTo validate that authentication is working, run an DAST API test and review the job logs and the test API's application logs.
Token has short expiration
If the bearer token must be generated and expires prior to the scan's completion, you can provide a program or script for the DAST API scanner to execute on a provided interval. The provided script runs in an Alpine Linux container that has Python 3 and Bash installed. If the Python script requires additional packages, it must detect this and install the packages at runtime.
The script must create a JSON file containing the bearer token in a specific format:
{
"headers" : {
"Authorization" : "Bearer dXNlcm5hbWU6cGFzc3dvcmQ="
}
}You must provide three CI/CD variables, each set for correct operation:
-
DAST_API_OVERRIDES_FILE: JSON file the provided command generates. -
DAST_API_OVERRIDES_CMD: Command that generates the JSON file. -
DAST_API_OVERRIDES_INTERVAL: Interval (in seconds) to run command.
For example:
stages:
  - dast

include:
  - template: DAST-API.gitlab-ci.yml

variables:
  DAST_API_PROFILE: Quick
  DAST_API_OPENAPI: test-api-specification.json
  DAST_API_TARGET_URL: http://test-deployment/
DAST_API_OVERRIDES_FILE: output/dast-api-overrides.json
DAST_API_OVERRIDES_CMD: renew_token.py
DAST_API_OVERRIDES_INTERVAL: 300To validate that authentication is working, run an DAST API test and review the job logs and the test API's application logs.
Configuration files
To get you started quickly, GitLab provides the configuration file
gitlab-dast-api-config.yml.
This file has several testing profiles that perform various numbers of tests. The run time of each
profile increases as the test numbers go up. To use a configuration file, add it to your
repository's root as .gitlab/gitlab-dast-api-config.yml.
Profiles
The following profiles are pre-defined in the default configuration file. Profiles can be added, removed, and modified by creating a custom configuration.
Quick
- Application Information Check
- Cleartext Authentication Check
- FrameworkDebugModeCheck
- HTML Injection Check
- Insecure Http Methods Check
- JSON Hijacking Check
- JSON Injection Check
- Sensitive Information Check
- Session Cookie Check
- SQL Injection Check
- Token Check
- XML Injection Check
Full
- Application Information Check
- Cleartext AuthenticationCheck
- CORS Check
- DNS Rebinding Check
- Framework Debug Mode Check
- HTML Injection Check
- Insecure Http Methods Check
- JSON Hijacking Check
- JSON Injection Check
- Open Redirect Check
- Sensitive File Check
- Sensitive Information Check
- Session Cookie Check
- SQL Injection Check
- TLS Configuration Check
- Token Check
- XML Injection Check
Available CI/CD variables
| CI/CD variable | Description |
|---|---|
DAST_API_VERSION |
Specify DAST API container version. Defaults to latest. |
DAST_API_TARGET_URL |
Base URL of API testing target. |
DAST_API_CONFIG |
DAST API configuration file. Defaults to .gitlab-dast-api.yml. |
DAST_API_PROFILE |
Configuration profile to use during testing. Defaults to Quick. |
FUZZAPI_EXCLUDE_PATHS |
Exclude API URL paths from testing. |
DAST_API_OPENAPI |
OpenAPI specification file or URL. |
DAST_API_HAR |
HTTP Archive (HAR) file. |
DAST_API_POSTMAN_COLLECTION |
Postman Collection file. |
DAST_API_POSTMAN_COLLECTION_VARIABLES |
Path to a JSON file to extract postman variable values. |
DAST_API_OVERRIDES_FILE |
Path to a JSON file containing overrides. |
DAST_API_OVERRIDES_ENV |
JSON string containing headers to override. |
DAST_API_OVERRIDES_CMD |
Overrides command. |
DAST_API_OVERRIDES_INTERVAL |
How often to run overrides command in seconds. Defaults to 0 (once). |
DAST_API_HTTP_USERNAME |
Username for HTTP authentication. |
DAST_API_HTTP_PASSWORD |
Password for HTTP authentication. |
DAST_API_SERVICE_START_TIMEOUT |
How long to wait for target API to become available in seconds. Default is 300 seconds. |
DAST_API_TIMEOUT |
How long to wait for API responses in seconds. Default is 30 seconds. |
Overrides
DAST API provides a method to add or override specific items in your request, for example:
- Headers
- Cookies
- Query string
- Form data
- JSON nodes
- XML nodes
You can use this to inject semantic version headers, authentication, and so on. The authentication section includes examples of using overrides for that purpose.
Overrides use a JSON document, where each type of override is represented by a JSON object:
{
"headers": {
"header1": "value",
"header2": "value"
},
"cookies": {
"cookie1": "value",
"cookie2": "value"
},
"query": {
"query-string1": "value",
"query-string2": "value"
},
"body-form": {
"form-param1": "value",
"form-param1": "value",
},
"body-json": {
"json-path1": "value",
"json-path2": "value",
},
"body-xml" : {
"xpath1": "value",
"xpath2": "value",
}
}Example of setting a single header:
{
"headers": {
"Authorization": "Bearer dXNlcm5hbWU6cGFzc3dvcmQ="
}
}Example of setting both a header and cookie:
{
"headers": {
"Authorization": "Bearer dXNlcm5hbWU6cGFzc3dvcmQ="
},
"cookies": {
"flags": "677"
}
}Example usage for setting a body-form override:
{
"body-form": {
"username": "john.doe"
}
}The override engine uses body-form when the request body has only form-data content.
Example usage for setting a body-json override:
{
"body-json": {
"$.credentials.access-token": "iddqd!42.$"
}
}Note that each JSON property name in the object body-json is set to a JSON Path
expression. The JSON Path expression $.credentials.access-token identifies the node to be
overridden with the value iddqd!42.$. The override engine uses body-json when the request body
has only JSON content.
For example, if the body is set to the following JSON:
{
"credentials" : {
"username" :"john.doe",
"access-token" : "non-valid-password"
}
}It is changed to:
{
"credentials" : {
"username" :"john.doe",
"access-token" : "iddqd!42.$"
}
}Here's an example for setting a body-xml override. The first entry overrides an XML attribute and
the second entry overrides an XML element:
{
"body-xml" : {
"/credentials/@isEnabled": "true",
"/credentials/access-token/text()" : "iddqd!42.$"
}
}Note that each JSON property name in the object body-xml is set to an
XPath v2
expression. The XPath expression /credentials/@isEnabled identifies the attribute node to override
with the value true. The XPath expression /credentials/access-token/text() identifies the
element node to override with the value iddqd!42.$. The override engine uses body-xml when the
request body has only XML
content.
For example, if the body is set to the following XML:
<credentials isEnabled="false">
<username>john.doe</username>
<access-token>non-valid-password</access-token>
</credentials>It is changed to:
<credentials isEnabled="true">
<username>john.doe</username>
<access-token>iddqd!42.$</access-token>
</credentials>You can provide this JSON document as a file or environment variable. You may also provide a command to generate the JSON document. The command can run at intervals to support values that expire.
Using a file
To provide the overrides JSON as a file, the DAST_API_OVERRIDES_FILE CI/CD variable is set. The path is relative to the job current working directory.
Here's an example .gitlab-ci.yml:
stages:
  - dast

include:
  - template: DAST-API.gitlab-ci.yml
variables:
DAST_API_PROFILE: Quick
DAST_API_OPENAPI: test-api-specification.json
DAST_API_TARGET_URL: http://test-deployment/
DAST_API_OVERRIDES_FILE: output/dast-api-overrides.jsonUsing a CI/CD variable
To provide the overrides JSON as a CI/CD variable, use the DAST_API_OVERRIDES_ENV variable.
This allows you to place the JSON as variables that can be masked and protected.
In this example .gitlab-ci.yml, the DAST_API_OVERRIDES_ENV variable is set directly to the JSON:
stages:
  - dast

include:
  - template: DAST-API.gitlab-ci.yml

variables:
  DAST_API_PROFILE: Quick
DAST_API_OPENAPI: test-api-specification.json
DAST_API_TARGET_URL: http://test-deployment/
DAST_API_OVERRIDES_ENV: '{"headers":{"X-API-Version":"2"}}'In this example .gitlab-ci.yml, the SECRET_OVERRIDES variable provides the JSON. This is a
group or instance level CI/CD variable defined in the UI:
stages:
  - dast

include:
  - template: DAST-API.gitlab-ci.yml
variables:
DAST_API_PROFILE: Quick
DAST_API_OPENAPI: test-api-specification.json
DAST_API_TARGET_URL: http://test-deployment/
DAST_API_OVERRIDES_ENV: $SECRET_OVERRIDESUsing a command
If the value must be generated or regenerated on expiration, you can provide a program or script for the DAST API scanner to execute on a specified interval. The provided script runs in an Alpine Linux container that has Python 3 and Bash installed. If the Python script requires additional packages, it must detect this and install the packages at runtime. The script creates the overrides JSON file as defined above.
You must provide three CI/CD variables, each set for correct operation:
-
DAST_API_OVERRIDES_FILE: File generated by the provided command. -
DAST_API_OVERRIDES_CMD: Command to generate JSON file. -
DAST_API_OVERRIDES_INTERVAL: Interval in seconds to run command.
stages:
  - dast

include:
  - template: DAST-API.gitlab-ci.yml

variables:
  DAST_API_PROFILE: Quick
DAST_API_OPENAPI: test-api-specification.json
DAST_API_TARGET_URL: http://test-deployment/
DAST_API_OVERRIDES_FILE: output/dast-api-overrides.json
DAST_API_OVERRIDES_CMD: renew_token.py
DAST_API_OVERRIDES_INTERVAL: 300Exclude Paths
- Introduced in GitLab 14.0.
When testing an API it can be useful to exclude certain paths. For example, you might exclude testing of an authentication service or an older version of the API. To exclude paths, use the FUZZAPI_EXCLUDE_PATHS CI/CD variable . This variable is specified in your .gitlab-ci.yml file. To exclude multiple paths, separate entries using the ; character. In the provided paths you can use a single character wildcard ? and * for a multiple character wildcard.
To verify the paths are excluded, review the Tested Operations and Excluded Operations portion of the job output. You should not see any excluded paths listed under Tested Operations.
2021-05-27 21:51:08 [INF] API Security: --[ Tested Operations ]-------------------------
2021-05-27 21:51:08 [INF] API Security: 201 POST http://target:7777/api/users CREATED
2021-05-27 21:51:08 [INF] API Security: ------------------------------------------------
2021-05-27 21:51:08 [INF] API Security: --[ Excluded Operations ]-----------------------
2021-05-27 21:51:08 [INF] API Security: GET http://target:7777/api/messages
2021-05-27 21:51:08 [INF] API Security: POST http://target:7777/api/messages
2021-05-27 21:51:08 [INF] API Security: ------------------------------------------------
Examples
This example excludes the /auth resource. This does not exclude child resources (/auth/child).
variables:
  DAST_API_EXCLUDE_PATHS=/auth
To exclude /auth, and child resources (/auth/child), we use a wildcard.
variables:
  DAST_API_EXCLUDE_PATHS=/auth*
To exclude multiple paths we use the ; character. In this example we exclude /auth* and /v1/*.
variables:
  DAST_API_EXCLUDE_PATHS=/auth*;/v1/*
Running your first scan
When configured correctly, a CI/CD pipeline contains a dast stage and an dast_api job. The job only fails when an invalid configuration is provided. During normal operation, the job always succeeds even if vulnerabilities are identified during testing.
Vulnerabilities are displayed on the Security pipeline tab with the suite name. When testing against the repositories default branch, the DAST API vulnerabilities are also shown on the Security & Compliance's Vulnerability Report page.
To prevent an excessive number of reported vulnerabilities, the DAST API scanner limits the number of vulnerabilities it reports per operation.
Viewing DAST API vulnerabilities
The DAST API analyzer produces a JSON report that is collected and used to populate the vulnerabilities into GitLab vulnerability screens.
See handling false positives for information about configuration changes you can make to limit the number of false positives reported.
View details of a DAST API vulnerability
Follow these steps to view details of a vulnerability:
-
You can view vulnerabilities in a project, or a merge request:
- In a project, go to the project's {shield} Security & Compliance > Vulnerability Report page. This page shows all vulnerabilities from the default branch only.
- In a merge request, go the merge request's Security section and click the Expand button. DAST API vulnerabilities are available in a section labeled DAST detected N potential vulnerabilities. Click the title to display the vulnerability details.
-
Click the vulnerabilities title to display the details. The table below describes these details.
Field Description Description Description of the vulnerability including what was modified. Project Namespace and project in which the vulnerability was detected. Method HTTP method used to detect the vulnerability. URL URL at which the vulnerability was detected. Request The HTTP request that caused the vulnerability. Unmodified Response Response from an unmodified request. This is what a normal working response looks like. Actual Response Response received from test request. Evidence How we determined a vulnerability occurred. Identifiers The DAST API check used to find this vulnerability. Severity Severity of the vulnerability. Scanner Type Scanner used to perform testing.
Security Dashboard
The Security Dashboard is a good place to get an overview of all the security vulnerabilities in your groups, projects and pipelines. For more information, see the Security Dashboard documentation.
Interacting with the vulnerabilities
Once a vulnerability is found, you can interact with it. Read more on how to address the vulnerabilities.
Handling False Positives
False positives can be handled in several ways:
- Dismiss the vulnerability.
- Some checks have several methods of detecting when a vulnerability is identified, called Assertions. Assertions can also be turned off and configured. For example, the DAST API scanner by default uses HTTP status codes to help identify when something is a real issue. If an API returns a 500 error during testing, this creates a vulnerability. This isn't always desired, as some frameworks return 500 errors often.
- Turn off the Check producing the false positive. This prevents the check from generating any vulnerabilities. Example checks are the SQL Injection Check, and JSON Hijacking Check.
Turn off a Check
Checks perform testing of a specific type and can be turned on and off for specific configuration
profiles. The provided configuration files define several profiles that you
can use. The profile definition in the configuration file lists all the checks that are active
during a scan. To turn off a specific check, remove it from the profile definition in the
configuration file. The profiles are defined in the Profiles section of the configuration file.
Example profile definition:
Profiles:
  - Name: Quick
    DefaultProfile: Empty
    Routes:
      - Route: *Route0
        Checks:
          - Name: ApplicationInformationCheck
          - Name: CleartextAuthenticationCheck
          - Name: FrameworkDebugModeCheck
          - Name: HtmlInjectionCheck
          - Name: InsecureHttpMethodsCheck
          - Name: JsonHijackingCheck
          - Name: JsonInjectionCheck
          - Name: SensitiveInformationCheck
          - Name: SessionCookieCheck
          - Name: SqlInjectionCheck
          - Name: TokenCheck
          - Name: XmlInjectionCheck
To turn off the JSON Hijacking Check you can remove these lines:
- Name: JsonHijackingCheckThis results in the following YAML:
- Name: Quick
  DefaultProfile: Empty
  Routes:
    - Route: *Route0
      Checks:
        - Name: ApplicationInformationCheck
        - Name: CleartextAuthenticationCheck
        - Name: FrameworkDebugModeCheck
        - Name: HtmlInjectionCheck
        - Name: InsecureHttpMethodsCheck
        - Name: JsonInjectionCheck
        - Name: SensitiveInformationCheck
        - Name: SessionCookieCheck
        - Name: SqlInjectionCheck
        - Name: TokenCheck
        - Name: XmlInjectionCheck
Turn off an Assertion for a Check
Assertions detect vulnerabilities in tests produced by checks. Many checks support multiple Assertions such as Log Analysis, Response Analysis, and Status Code. When a vulnerability is found, the Assertion used is provided. To identify which Assertions are on by default, see the Checks default configuration in the configuration file. The section is called Checks.
This example shows the SQL Injection Check:
- Name: SqlInjectionCheck
  Configuration:
    UserInjections: []
  Assertions:
    - Name: LogAnalysisAssertion
    - Name: ResponseAnalysisAssertion
    - Name: StatusCodeAssertion
Here you can see three Assertions are on by default. A common source of false positives is
StatusCodeAssertion. To turn it off, modify its configuration in the Profiles section. This
example provides only the other two Assertions (LogAnalysisAssertion,
ResponseAnalysisAssertion). This prevents SqlInjectionCheck from using StatusCodeAssertion:
Profiles:
  - Name: Quick
    DefaultProfile: Empty
    Routes:
      - Route: *Route0
        Checks:
          - Name: ApplicationInformationCheck
          - Name: CleartextAuthenticationCheck
          - Name: FrameworkDebugModeCheck
          - Name: HtmlInjectionCheck
          - Name: InsecureHttpMethodsCheck
          - Name: JsonHijackingCheck
          - Name: JsonInjectionCheck
          - Name: SensitiveInformationCheck
          - Name: SessionCookieCheck
          - Name: SqlInjectionCheck
            Assertions:
              - Name: LogAnalysisAssertion
              - Name: ResponseAnalysisAssertion
          - Name: TokenCheck
          - Name: XmlInjectionCheck
Troubleshooting
Failed to start scanner session (version header not found)
The DAST API engine outputs an error message when it cannot establish a connection with the scanner application component. The error message is shown in the job output window of the dast_api job. A common cause of this issue is changing the DAST_API_API variable from its default.
Error message
- In GitLab 13.11 and later,
Failed to start scanner session (version header not found). - In GitLab 13.10 and earlier,
API Security version header not found. Are you sure that you are connecting to the API Security server?.
Solution
- Remove the
DAST_API_APIvariable from the.gitlab-ci.ymlfile. The value will be inherited from the DAST API CI/CD template. We recommend this method instead of manually setting a value. - If removing the variable is not possible, check to see if this value has changed in the latest version of the DAST API CI/CD template. If so, update the value in the
.gitlab-ci.ymlfile.
Application cannot determine the base URL for the target API
The DAST API engine outputs an error message when it cannot determine the target API after inspecting the OpenAPI document. This error message is shown when the target API has not been set in the .gitlab-ci.yml file, it is not available in the environment_url.txt file, and it could not be computed using the OpenAPI document.
There is a order of precedence in which the DAST API engine tries to get the target API when checking the different sources. First, it will try to use the DAST_API_TARGET_URL. If the environment variable has not been set, then the DAST API engine will attempt to use the environment_url.txt file. If there is no file environment_url.txt, then the DAST API engine will use the OpenAPI document contents and the URL provided in DAST_API_OPENAPI (if a URL is provided) to try to compute the target API.
The best-suited solution will depend on whether or not your target API changes for each deployment. In static environments, the target API is the same for each deployment, in this case please refer to the static environment solution. If the target API changes for each deployment a dynamic environment solution should be applied.
Static environment solution
This solution is for pipelines in which the target API URL doesn't change (is static).
Add environmental variable
For environments where the target API remains the same, we recommend you specify the target URL by using the DAST_API_TARGET_URL environment variable. In your .gitlab-ci.yml, add a variable DAST_API_TARGET_URL. The variable must be set to the base URL of API testing target. For example:
include:
    - template: DAST-API.gitlab-ci.yml

  variables:
    DAST_API_TARGET_URL: http://test-deployment/
    DAST_API_OPENAPI: test-api-specification.json
Dynamic environment solutions
In a dynamic environment your target API changes for each different deployment. In this case, there is more than one possible solution, we recommend you use the environment_url.txt file when dealing with dynamic environments.
Use environment_url.txt
To support dynamic environments in which the target API URL changes during each pipeline, DAST API engine supports the use of an environment_url.txt file that contains the URL to use. This file is not checked into the repository, instead it's created during the pipeline by the job that deploys the test target and collected as an artifact that can be used by later jobs in the pipeline. The job that creates the environment_url.txt file must run before the DAST API engine job.
- Modify the test target deployment job adding the base URL in an
environment_url.txtfile at the root of your project. - Modify the test target deployment job collecting the
environment_url.txtas an artifact.
Example:
deploy-test-target:
  script:
    # Perform deployment steps
    # Create environment_url.txt (example)
    - echo http://${CI_PROJECT_ID}-${CI_ENVIRONMENT_SLUG}.example.org > environment_url.txt

  artifacts:
    paths:
      - environment_url.txt
Glossary
- Assert: Assertions are detection modules used by checks to trigger a vulnerability. Many assertions have configurations. A check can use multiple Assertions. For example, Log Analysis, Response Analysis, and Status Code are common Assertions used together by checks. Checks with multiple Assertions allow them to be turned on and off.
- Check: Performs a specific type of test, or performed a check for a type of vulnerability. For example, the SQL Injection Check performs DAST testing for SQL Injection vulnerabilities. The DAST API scanner is comprised of several checks. Checks can be turned on and off in a profile.
- Profile: A configuration file has one or more testing profiles, or sub-configurations. You may have a profile for feature branches and another with extra testing for a main branch.