Releases (FREE)
Introduced in GitLab 11.7.
To introduce a checkpoint in your source code history, you can assign a Git tag at the moment of release. However, in most cases, your users need more than just the raw source code. They need compiled objects or other assets output by your CI/CD system.
A GitLab Release is a snapshot of the source, build output, artifacts, and other metadata associated with a released version of your code.
You can create a GitLab release on any branch. When you create a release:
- GitLab automatically archives source code and associates it with the release.
- GitLab automatically creates a JSON file that lists everything in the release, so you can compare and audit releases. This file is called release evidence.
- You can add release notes and a message for the tag associated with the release.
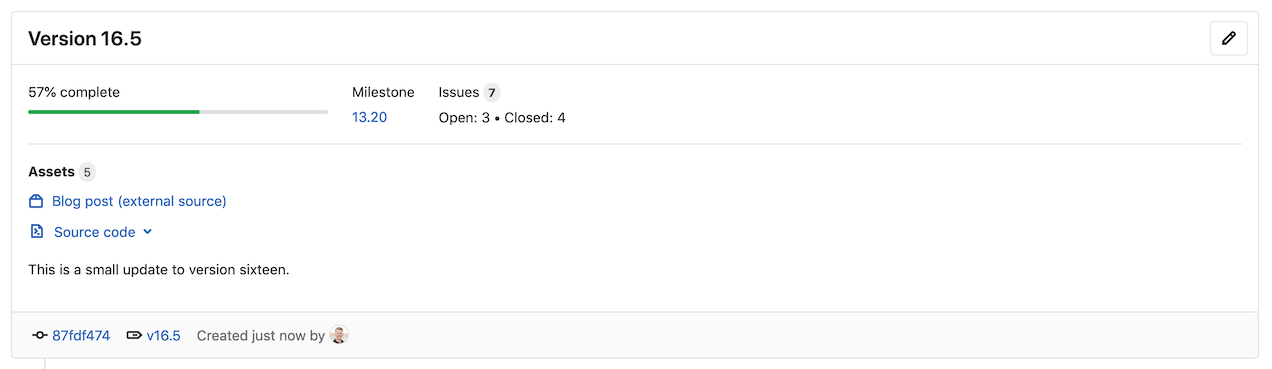
After you create a release, you can associate milestones with it, and attach release assets, like runbooks or packages.
View releases
Introduced in GitLab 12.8.
To view a list of releases:
-
On the left sidebar, select Deployments > Releases, or
-
On the project's overview page, if at least one release exists, click the number of releases.

- On public projects, this number is visible to all users.
- On private projects, this number is visible to users with Reporter permissions or higher.

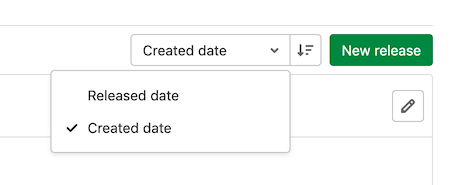
Sort Releases
On the top right of the Releases page, you can use the sorting button to order releases by Released date or Created date. You can sort releases in ascending or descending order.
Create a release
Introduced in GitLab 12.9. Releases can be created directly in the GitLab UI.
You can create a release in the user interface, or by using the Releases API. We recommend using the API to create releases as one of the last steps in your CI/CD pipeline.
Only users with Developer permissions or higher can create releases. Read more about Release permissions.
To create a new release through the GitLab UI:
- On the left sidebar, select Deployments > Releases and select New release.
- Open the Tag name dropdown. Select an existing tag or type in a new tag name. Selecting an existing tag that is already associated with a release will result in a validation error.
- If creating a new tag, open the Create from dropdown. Select a branch, tag, or commit SHA to use when creating the new tag.
- Optionally, fill out any additional information about the release, such as its title, milestones, release notes, or assets links.
- Click Create release.
Create release from GitLab CI
Introduced in GitLab 12.7.
You can create a release directly from the GitLab CI pipeline
by using a release node in the job definition.
The release is created only if the job processes without error. If the Rails API returns an error during release creation, the release job fails.
Upcoming releases
Introduced in GitLab 12.1.
You can create a release ahead of time by using the Releases API.
When you set a future released_at date, an Upcoming Release badge is displayed next to the
release tag. When the released_at date and time has passed, the badge is automatically removed.

Edit a release
Introduced in GitLab 12.6. Asset link editing was introduced in GitLab 12.10.
Only users with Developer permissions or higher can edit releases. Read more about Release permissions.
To edit the details of a release:
- On the left sidebar, select Deployments > Releases.
- In the top-right corner of the release you want to modify, click Edit this release (the pencil icon).
- On the Edit Release page, change the release's details.
- Click Save changes.
You can edit the release title, notes, associated milestones, and asset links. To change the release date use the Releases API.
Add release notes to Git tags
If you have an existing Git tag, you can add release notes to it.
You can do this in the user interface, or by using the Releases API. We recommend using the API to add release notes as one of the last steps in your CI/CD release pipeline.
In the interface, to add release notes to a new Git tag:
- Navigate to your project's Repository > Tags.
- Click New tag.
- In the Release notes field, enter the release's description. You can use Markdown and drag and drop files to this field.
- Click Create tag.
In the interface, to add release notes to an existing Git tag:
- Navigate to your project's Repository > Tags.
- Click Edit release notes (the pencil icon).
- In the Release notes field, enter the release's description. You can use Markdown in this field, and drag and drop files to it.
- Click Save changes.
Associate milestones with a release
- Introduced in GitLab 12.5.
- Updated to edit milestones in the UI in GitLab 13.0.
You can associate a release with one or more project milestones.
GitLab Premium customers can specify group milestones to associate with a release.
You can do this in the user interface, or by including a milestones array in your request to
the Releases API.
In the user interface, to associate milestones to a release:
- On the left sidebar, select Deployments > Releases.
- In the top-right corner of the release you want to modify, click Edit this release (the pencil icon).
- From the Milestones list, select each milestone you want to associate. You can select multiple milestones.
- Click Save changes.
On the Deployments > Releases page, the Milestone is listed in the top section, along with statistics about the issues in the milestones.
Releases are also visible on the Issues > Milestones page, and when you click a milestone on this page.
Here is an example of milestones with no releases, one release, and two releases, respectively.

Get notified when a release is created
Introduced in GitLab 12.4.
You can be notified by email when a new release is created for your project.
To subscribe to notifications for releases:
- On the left sidebar, select Project information.
- Click Notification setting (the bell icon).
- In the list, click Custom.
- Select the New release check box.
- Close the dialog box to save.
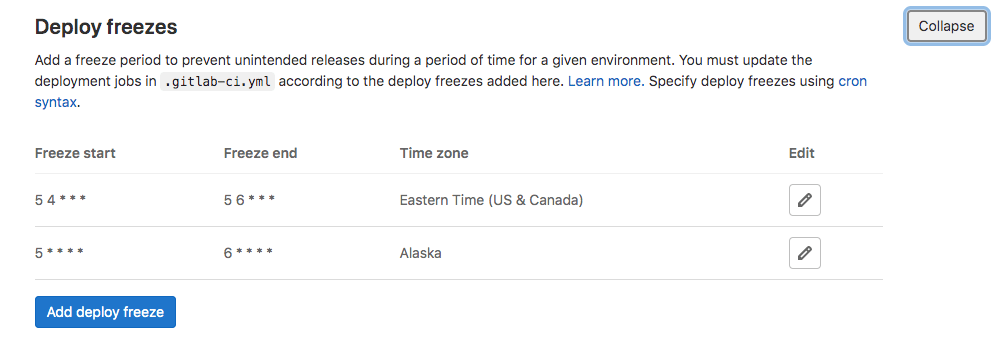
Prevent unintentional releases by setting a deploy freeze
Introduced in GitLab 13.0.
Prevent unintended production releases during a period of time you specify by setting a deploy freeze period. Deploy freezes help reduce uncertainty and risk when automating deployments.
A maintainer can set a deploy freeze window in the user interface or by using the Freeze Periods API to set a freeze_start and a freeze_end, which
are defined as crontab entries.
If the job that's executing is within a freeze period, GitLab CI/CD creates an environment
variable named $CI_DEPLOY_FREEZE.
To prevent the deployment job from executing, create a rules entry in your
gitlab-ci.yml, for example:
deploy_to_production:
  stage: deploy
  script: deploy_to_prod.sh
  rules:
    - if: $CI_DEPLOY_FREEZE == null
To set a deploy freeze window in the UI, complete these steps:
- Sign in to GitLab as a user with the Maintainer role.
- On the left sidebar, select Project information.
- In the left navigation menu, navigate to Settings > CI/CD.
- Scroll to Deploy freezes.
- Click Expand to see the deploy freeze table.
- Click Add deploy freeze to open the deploy freeze modal.
- Enter the start time, end time, and timezone of the desired deploy freeze period.
- Click Add deploy freeze in the modal.
- After the deploy freeze is saved, you can edit it by selecting the edit button ({pencil}).
WARNING: To delete a deploy freeze, use the Freeze Periods API.
If a project contains multiple freeze periods, all periods apply. If they overlap, the freeze covers the complete overlapping period.
For more information, see Deployment safety.
Release fields
The following fields are available when you create or edit a release.
Title
The release title can be customized using the Release title field when creating or editing a release. If no title is provided, the release's tag name is used instead.
Guest users of private projects are allowed to view the Releases page but are not allowed to view details about the Git repository (in particular, tag names). Because of this, release titles are replaced with a generic title like "Release-1234" for Guest users to avoid leaking tag name information.
See the Permissions page for more information about permissions.
Tag name
The release tag name should include the release version. GitLab uses Semantic Versioning
for our releases, and we recommend you do too. Use (Major).(Minor).(Patch), as detailed in the
GitLab Policy for Versioning.
For example, for GitLab version 10.5.7:
-
10represents the major version. The major release was10.0.0, but often referred to as10.0. -
5represents the minor version. The minor release was10.5.0, but often referred to as10.5. -
7represents the patch number.
Any part of the version number can be multiple digits, for example, 13.10.11.
Release notes description
Every release has a description. You can add any text you like, but we recommend including a changelog to describe the content of your release. This helps users quickly scan the differences between each release you publish.
Git's tagging messages and Release note descriptions are unrelated. Description supports Markdown.
Release assets
A release contains the following types of assets:
Source code
GitLab automatically generates zip, tar.gz, tar.bz2, and tar
archived source code from the given Git tag. These are read-only assets.
Permanent links to release assets
Introduced in GitLab 12.9.
The assets associated with a release are accessible through a permanent URL. GitLab always redirects this URL to the actual asset location, so even if the assets move to a different location, you can continue to use the same URL. This is defined during link creation or updating.
Each asset has a name, a url of the actual asset location, and optionally,
filepath and link_type parameters.
A filepath creates a URL pointing to the asset for the Release.
The link_type parameter accepts one of the following four values:
runbookpackageimage-
other(default)
This field has no effect on the URL and it's only used for visual purposes in the Releases page of your project.
The format of the URL is:
https://host/namespace/project/releases/:release/downloads/:filepathIf you have an asset for the v11.9.0-rc2 release in the gitlab-org
namespace and gitlab-runner project on gitlab.com, for example:
{
  "name": "linux amd64",
  "filepath": "/binaries/gitlab-runner-linux-amd64",
  "url": "https://gitlab-runner-downloads.s3.amazonaws.com/v11.9.0-rc2/binaries/gitlab-runner-linux-amd64",
  "link_type": "other"
}
This asset has a direct link of:
https://gitlab.com/gitlab-org/gitlab-runner/releases/v11.9.0-rc2/downloads/binaries/gitlab-runner-linux-amd64The physical location of the asset can change at any time and the direct link remains unchanged.
Links
A link is any URL which can point to whatever you like: documentation, built binaries, or other related materials. These can be both internal or external links from your GitLab instance.
The four types of links are "Runbook," "Package," "Image," and "Other."
Release evidence
Introduced in GitLab 12.6.
Each time a release is created, GitLab takes a snapshot of data that's related to it. This data is saved in a JSON file and called release evidence. The feature includes test artifacts and linked milestones to facilitate internal processes, like external audits.
To access the release evidence, on the Releases page, click the link to the JSON file that's listed under the Evidence collection heading.
You can also use the API to generate release evidence for an existing release. Because of this, each release can have multiple release evidence snapshots. You can view the release evidence and its details on the Releases page.
When the issue tracker is disabled, release evidence can't be downloaded.
Here is an example of a release evidence object:
{
  "release": {
    "id": 5,
    "tag_name": "v4.0",
    "name": "New release",
    "project": {
      "id": 20,
      "name": "Project name",
      "created_at": "2019-04-14T11:12:13.940Z",
      "description": "Project description"
    },
    "created_at": "2019-06-28 13:23:40 UTC",
    "description": "Release description",
    "milestones": [
      {
        "id": 11,
        "title": "v4.0-rc1",
        "state": "closed",
        "due_date": "2019-05-12 12:00:00 UTC",
        "created_at": "2019-04-17 15:45:12 UTC",
        "issues": [
          {
            "id": 82,
            "title": "The top-right popup is broken",
            "author_name": "John Doe",
            "author_email": "john@doe.com",
            "state": "closed",
            "due_date": "2019-05-10 12:00:00 UTC"
          },
          {
            "id": 89,
            "title": "The title of this page is misleading",
            "author_name": "Jane Smith",
            "author_email": "jane@smith.com",
            "state": "closed",
            "due_date": "nil"
          }
        ]
      },
      {
        "id": 12,
        "title": "v4.0-rc2",
        "state": "closed",
        "due_date": "2019-05-30 18:30:00 UTC",
        "created_at": "2019-04-17 15:45:12 UTC",
        "issues": []
      }
    ],
    "report_artifacts": [
      {
        "url":"https://gitlab.example.com/root/project-name/-/jobs/111/artifacts/download"
      }
    ]
  }
}
Collect release evidence (PREMIUM SELF)
Introduced in GitLab Premium 12.10.
When a release is created, release evidence is automatically collected. To initiate evidence collection any other time, use an API call. You can collect release evidence multiple times for one release.
Evidence collection snapshots are visible on the Releases page, along with the timestamp the evidence was collected.
Include report artifacts as release evidence (ULTIMATE)
Introduced in GitLab Ultimate 13.2.
When you create a release, if job artifacts are included in the last pipeline that ran, they are automatically included in the release as release evidence.
Although job artifacts normally expire, artifacts included in release evidence do not expire.
To enable job artifact collection you need to specify both:
ruby:
  script:
    - gem install bundler
    - bundle install
    - bundle exec rspec --format progress --format RspecJunitFormatter --out rspec.xml
  artifacts:
    paths:
      - rspec.xml
    reports:
      junit: rspec.xml
If the pipeline ran successfully, when you create your release, the rspec.xml file is saved as
release evidence.
If you schedule release evidence collection,
some artifacts may already be expired by the time of evidence collection. To avoid this you can use
the artifacts:expire_in
keyword. Learn more in this issue.
Schedule release evidence collection
Introduced in GitLab 12.8.
In the API:
- If you specify a future
released_atdate, the release becomes an Upcoming Release and the evidence is collected on the date of the release. You cannot collect release evidence before then. - If you use a past
released_atdate, no evidence is collected. - If you do not specify a
released_atdate, release evidence is collected on the date the release is created.
Release Command Line
Introduced in GitLab 12.10.
The Release CLI is a command-line tool for managing GitLab Releases from the command line or from
the GitLab CI/CD configuration file, .gitlab-ci.yml.
With it, you can create, update, modify, and delete releases right through the terminal.
Read the Release CLI documentation for details.
Release Metrics (ULTIMATE)
Introduced in GitLab Premium 13.9.
Group-level release metrics are available by navigating to Group > Analytics > CI/CD. These metrics include:
- Total number of releases in the group
- Percentage of projects in the group that have at least one release