Description templates
We all know that a properly submitted issue is more likely to be addressed in a timely manner by the developers of a project.
With description templates, you can define context-specific templates for issue and merge request description fields for your project, and filter out unnecessary noise from issues.
By using the description templates, users that create a new issue or merge request can select a description template to help them communicate with other contributors effectively.
Every GitLab project can define its own set of description templates as they are added to the root directory of a GitLab project's repository.
Description templates must be written in Markdown and stored
in your project's repository in the .gitlab directory. Only the
templates of the default branch are taken into account.
To learn how to create templates for various file types in groups, visit Group file templates.
Use cases
These are some situations when you might find description templates useful:
- You can create issues and merge request templates for different stages of your workflow, for example, feature proposal, feature improvement, or a bug report.
- Add a template to be used in every issue for a specific project, giving instructions and guidelines, requiring for information specific to that subject. For example, if you have a project for tracking new blog posts, you can require the title, outlines, author name, and author social media information.
- Following the previous example, you can make a template for every MR submitted with a new blog post, requiring information about the post date, front matter data, images guidelines, link to the related issue, reviewer name, and so on.
- You can also create issues and merge request templates for different stages of your workflow, for example, feature proposal, feature improvement, or a bug report.
- You can use an issue description template as a Service Desk email template.
Create an issue template
Create a new Markdown (.md) file inside the .gitlab/issue_templates/
directory in your repository. Commit and push to your default branch.
To create a Markdown file:
- In a project, go to Repository.
- Next to the default branch, select the {plus} button.
- Select New file.
- Next to the default branch, in the File name field, add the name of your issue template.
Make sure that your file has the
.mdextension, for examplefeature_request.mdorFeature Request.md. - Commit and push to your default branch.
If you don't have a .gitlab/issue_templates directory in your repository, you need to create it.
To create the .gitlab/issue_templates directory:
- In a project, go to Repository.
- Next to the default branch, select the {plus} button.
- Select New directory.
- Name this new directory
.gitlaband commit to your default branch. - Next to the default branch, select the {plus} button.
- Select New directory.
- Name your directory
issue_templatesand commit to your default branch.
To check if this has worked correctly, create a new issue and see if you can choose a description template.
Create a merge request template
Similarly to issue templates, create a new Markdown (.md) file inside the
.gitlab/merge_request_templates/ directory in your repository. Commit and
push to your default branch.
Use the templates
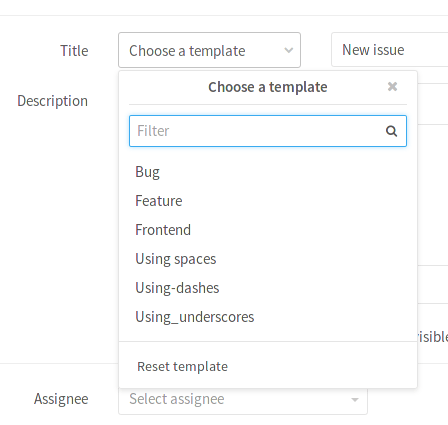
Let's take for example that you've created the file .gitlab/issue_templates/Bug.md.
This enables the Bug dropdown option when creating or editing issues. When
Bug is selected, the content from the Bug.md template file is copied
to the issue description field. The Reset template button discards any
changes you made after picking the template and returns it to its initial status.
NOTE:
You can create shortcut links to create an issue using a designated template.
For example: https://gitlab.com/gitlab-org/gitlab/-/issues/new?issuable_template=Feature%20proposal.
You can set description templates at various levels:
- The entire instance
- A specific group or subgroup
- A specific project
The templates are inherited. For example, in a project, you can also access templates set for the instance or the project's parent groups.
Set instance-level description templates (PREMIUM SELF)
- Introduced in GitLab 13.9.
- Feature flag removed in GitLab 14.0.
You can set a description template at the instance level for issues and merge requests. As a result, these templates are available in all projects within the instance.
Only instance administrators can set instance-level templates.
To set the instance-level description template repository:
- On the top bar, select Menu > {admin} Admin.
- On the left sidebar, select Settings > Templates.
- Expand Templates
- From the dropdown, select your template project as the template repository at instance level.
- Select Save changes.

Learn more about instance template repository.
Set group-level description templates (PREMIUM)
- Introduced in GitLab 13.9.
- Feature flag removed in GitLab 14.0.
With group-level description templates, you can store your templates in a single repository and configure the group file templates setting to point to that repository. As a result, you can use the same templates in issues and merge requests in all the group's projects.
To re-use templates you've created:
- Go to the group's Settings > General > Templates.
- From the dropdown, select your template project as the template repository at group level.
- Select Save changes.

Set a default template for merge requests and issues (PREMIUM)
In a project, you can choose a default description template for new issues and merge requests. As a result, every time a new merge request or issue is created, it's pre-filled with the text you entered in the template.
The visibility of issues or merge requests should be set to either "Everyone with access" or "Only Project Members" in your project's Settings / Visibility, project features, permissions section. Otherwise, the template text areas don't show. This is the default behavior, so in most cases you should be fine.
To set a default description template for merge requests:
- Go to your project's Settings.
- Select Expand under the Merge requests header.
- Fill in the Default description template for merge requests text area.
- Select Save changes.
To set a default description template for issues:
- Select Expand under Default issue template.
- Fill in the Default description template for issues text area.
Because GitLab merge request and issues support Markdown, you can use it to format headings, lists, and so on.
GitLab versions 13.10 and later
provide issues_template and merge_requests_template attributes in the
Projects API to help you keep your templates up to date.
Description template example
We use description templates for issues and merge requests in the
.gitlab folder of the
GitLab project, which you can refer to for some examples.
NOTE: It's possible to use quick actions in description templates to quickly add labels, assignees, and milestones. The quick actions are only executed if the user submitting the issue or merge request has the permissions to perform the relevant actions.
Here is an example of a bug report template:
## Summary

(Summarize the bug encountered concisely)

## Steps to reproduce

(How one can reproduce the issue - this is very important)

## Example Project

(If possible, please create an example project here on GitLab.com that exhibits the problematic
behavior, and link to it here in the bug report.
If you are using an older version of GitLab, this will also determine whether the bug has been fixed
in a more recent version)

## What is the current bug behavior?

(What actually happens)

## What is the expected correct behavior?

(What you should see instead)

## Relevant logs and/or screenshots

(Paste any relevant logs - please use code blocks (```) to format console output, logs, and code, as
it's very hard to read otherwise.)

## Possible fixes

(If you can, link to the line of code that might be responsible for the problem)

/label ~bug ~reproduced ~needs-investigation
/cc @project-manager
/assign @qa-tester